> ## Documentation Index
> Fetch the complete documentation index at: https://docs.reloops.app/llms.txt
> Use this file to discover all available pages before exploring further.
# Get Started with Reloops: Five Steps to First Review
> Go from sign-up to your first reviewed asset in five steps - create a workspace, start a project, upload files, leave feedback, and track progress.
Follow this guide to complete your first working setup in Reloops. By the end, you will have a workspace, a project, and at least one asset open for review. If you want a screen-by-screen map of the product before you begin, see the [Product walkthrough](/onboarding/product-walkthrough).
Sign in to Reloops, then choose an existing workspace or create a new one. If you are starting fresh, select **New Workspace** and enter a clear name - use a client, brand, or team name so the workspace is easy to identify later. If a colleague already created a workspace for your team, ask them to invite you and then accept the invitation.
Inside the workspace, create a project to hold the work you want to review. Projects keep assets, feedback, and approval status organized in one place.
1. Open the **Projects** page from the workspace sidebar.
2. Select **New Project**.
3. Enter a project name.
4. Confirm to create it.
Start with an empty project unless a template already matches your workflow - the Social Media template, for example, pre-populates folders and statuses.
With the project open, select the **Upload** button and choose files from your device - or drag and drop them directly onto the project assets view. Use **Upload Folder** when you want to preserve a local folder structure. Reloops supports video, images, PDFs, website captures, and other common file types. After the upload finishes, each file appears as its own asset card in the Assets view, ready to open for review.
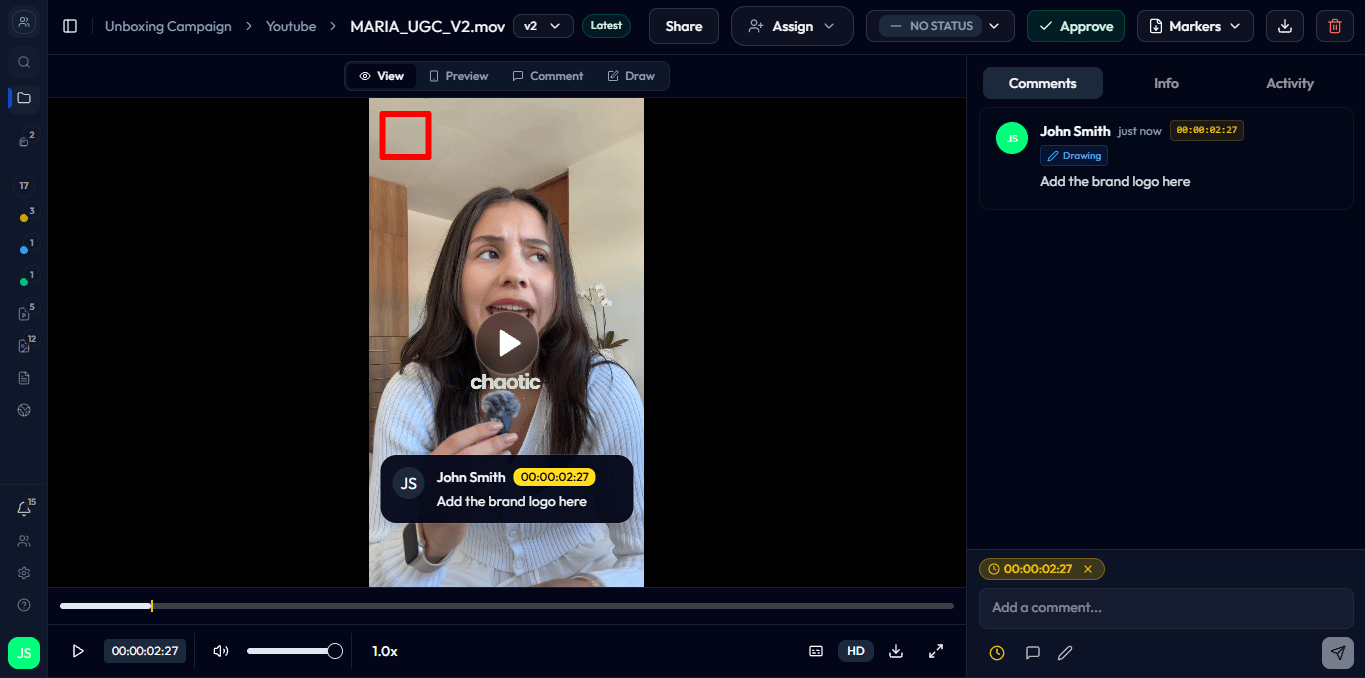
 Select any asset card to open the asset review page. From here you can:
* **Leave a comment** - type feedback at any timestamp (for video) or pin it to a specific location on the file.
* **Add annotations** - draw or highlight directly on the asset.
* **Assign the asset** - route it to the right team member for action.
* **Update the status** - move the asset to **Needs review**, **In review**, or **Approved**.
* **Share with a reviewer** - generate a share link to send to a client or external stakeholder who does not have a Reloops account.
Select any asset card to open the asset review page. From here you can:
* **Leave a comment** - type feedback at any timestamp (for video) or pin it to a specific location on the file.
* **Add annotations** - draw or highlight directly on the asset.
* **Assign the asset** - route it to the right team member for action.
* **Update the status** - move the asset to **Needs review**, **In review**, or **Approved**.
* **Share with a reviewer** - generate a share link to send to a client or external stakeholder who does not have a Reloops account.
 As the team works through feedback, keep statuses up to date - **Needs review**, **In review**, **Approved**, or **No status**. Switch to the **Kanban** view inside the project to see review-stage assets grouped by status in a single board. Move cards between columns to update status, and use the board as your source of truth for where each deliverable stands.
 ## What to do next
Continue with the guide that matches your next task.
Invite team members, manage roles, and configure workspace settings.
Learn how to organize, filter, and manage assets inside a project.
Master comments, annotations, approvals, and version comparisons.
## What to do next
Continue with the guide that matches your next task.
Invite team members, manage roles, and configure workspace settings.
Learn how to organize, filter, and manage assets inside a project.
Master comments, annotations, approvals, and version comparisons.